

Yes, you can board a loft without removing insulation, but the boards must sit above it rather than squash it. UK Building Regulations recommend a minimum insulation depth of 270mm, which can be higher than the space between the ceiling joists. Raised supports can create room for the insulation beneath a usable boarded area.
It’s understandable to want storage without disturbing the insulation already in place. The key is to install boards above the insulation, rather than directly on top of it. This keeps the insulation at its intended depth while allowing air to move through the loft.
This guide explains when direct-to-joist boarding may work, how raised boards preserve insulation depth, and what to consider before starting. You’ll also learn how to keep airflow clear, spot potential condensation risks and plan a boarded area for storage. With the right layout, you can create useful space without compressing the insulation beneath the floor.
Key Takeaways
- Keep boards above the insulation so it can retain its depth and do its job.
- Plan the boarded area around existing airflow paths to help reduce condensation risk.
- Use a raised support system suited to the insulation depth and the loft’s joists.
- Keep the loft for suitable storage, and avoid concentrating heavy items in one area.
- Before boarding, consider how the work may affect thermal performance, access and structural safety.
Can You Install Loft Boards Without Damaging Your Insulation?
Yes, you can board a loft without removing insulation, provided the boards sit above it rather than compress it. UK lofts are recommended to have at least 270mm of insulation before boarding, with enough clearance to preserve its depth.
-
Check the Existing Insulation
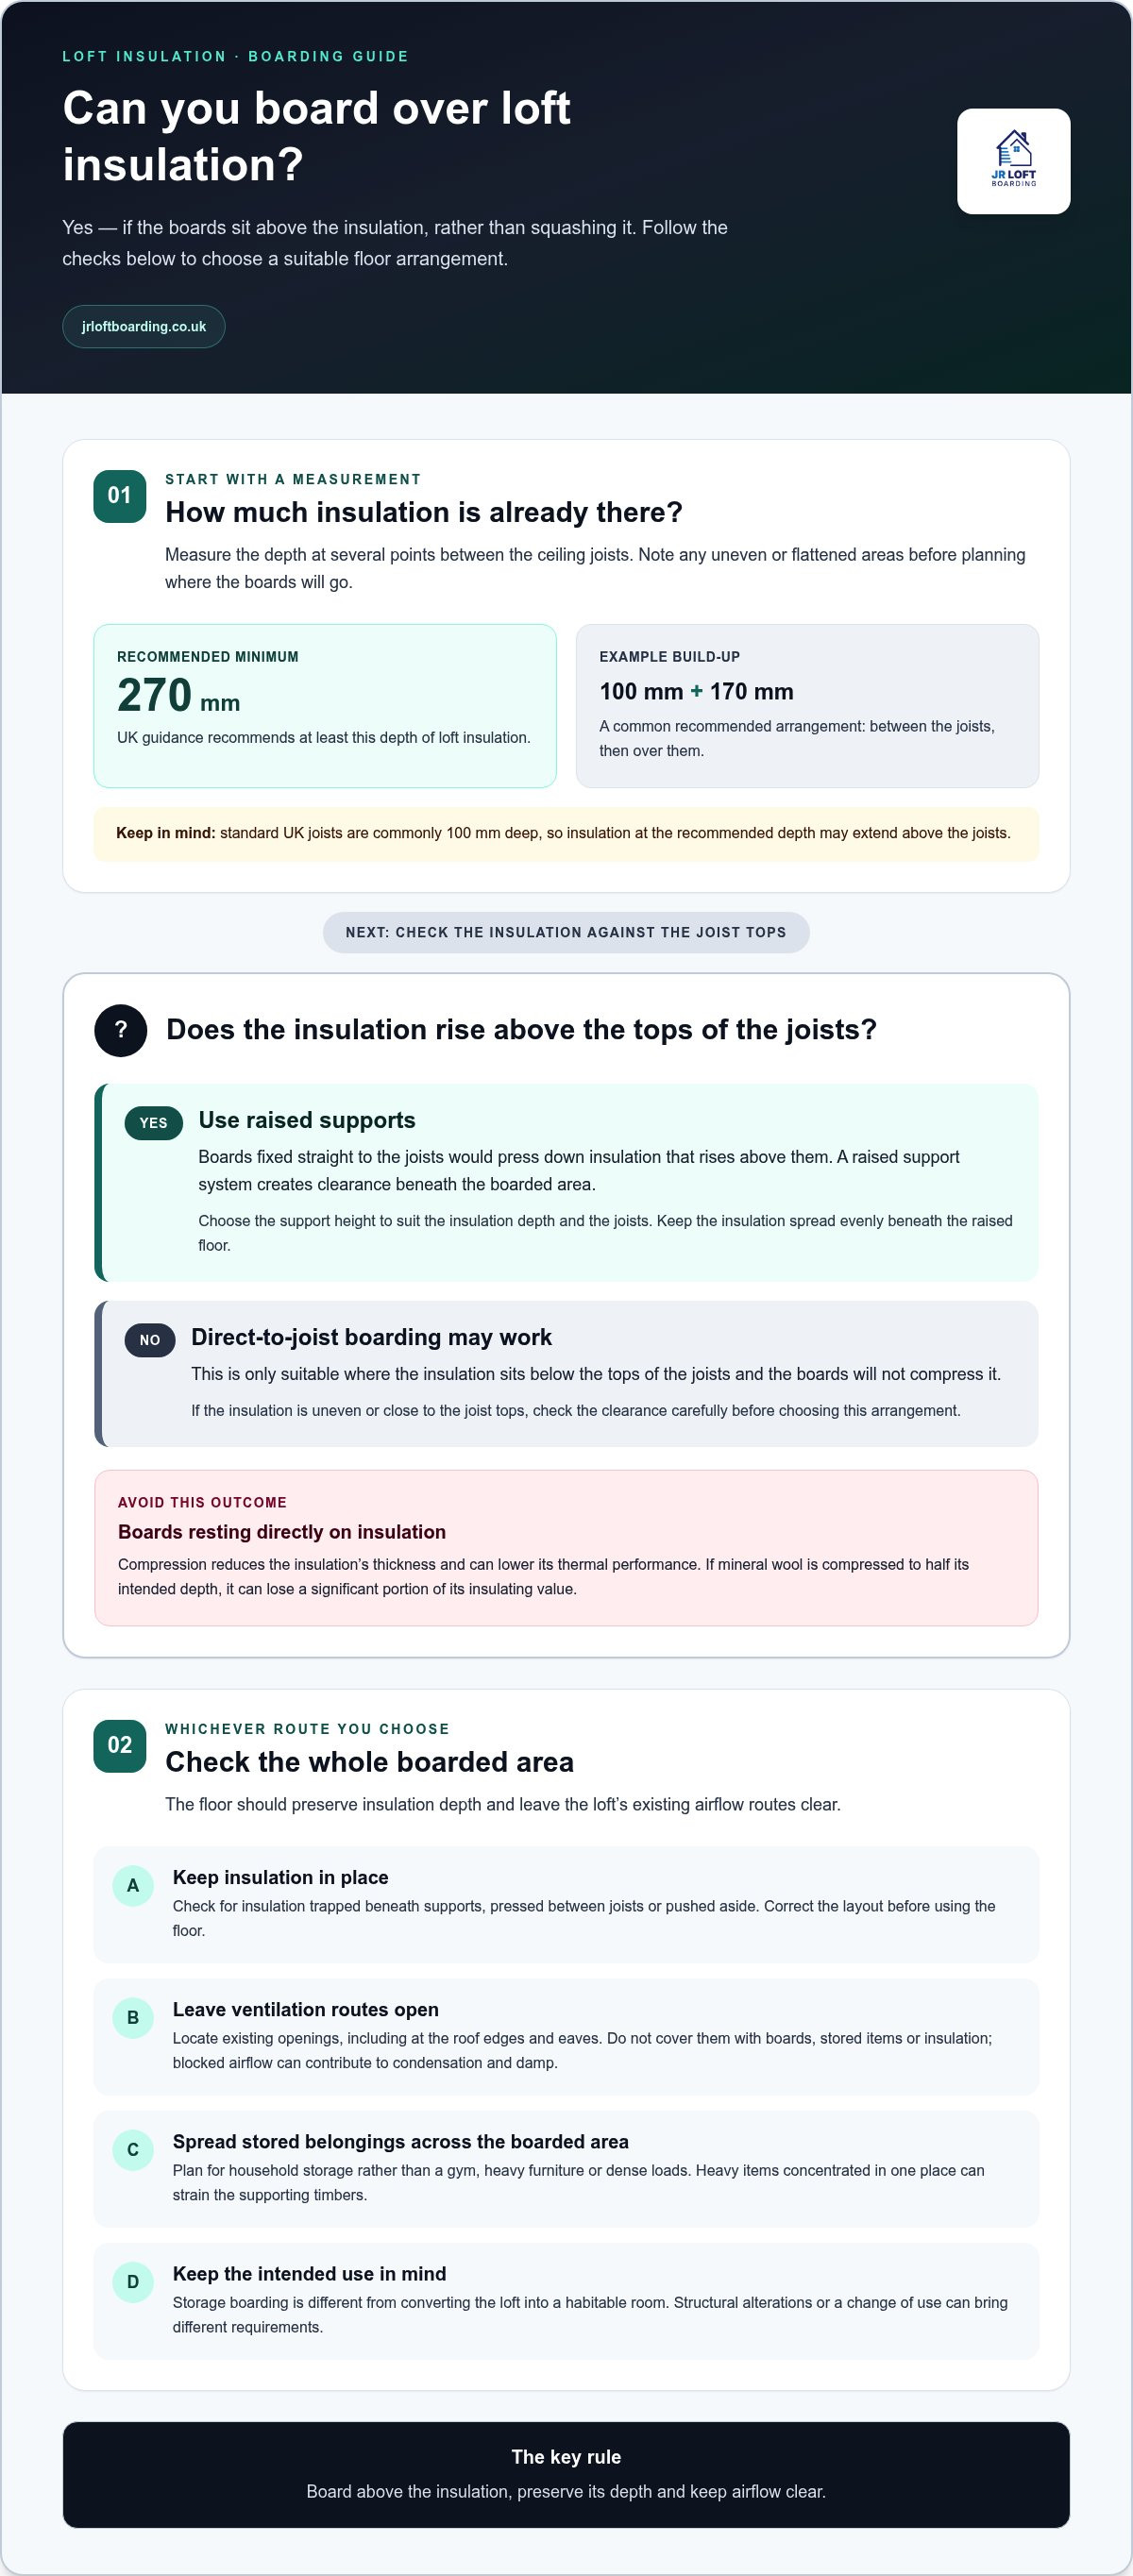
Measure the insulation depth at several points between the ceiling joists before planning your boarded area. A common recommended build-up is 100mm between joists and 170mm over them, giving 270mm in total. Compare what you find with that guidance, and note where the insulation is uneven or flattened.
Check whether the insulation reaches above the joists. Most standard UK joists are 100mm deep, so insulation at the recommended depth may extend well above them. Keep your footing on joists or suitable access boards, not on the insulation. Use the loft ladder carefully, and avoid moving insulation simply to make room for boards.
-
Plan Boards Above the Insulation
Use a raised support system so the boards sit above the insulation without pressing on it. Direct-to-joist boarding may work only where the insulation sits below the tops of the joists. If it rises above them, boards fixed straight to the joists will press it down.
Allow for the height of the insulation when choosing the raised floor arrangement. A typical recommended depth of 270mm can exceed the clearance between joists and boards. Keep the insulation spread evenly beneath the raised area, rather than pushing it into gaps or leaving it bunched against the supports. This helps retain its depth across the boarded space.
-
Consider the Effects of Compression
Don’t place boards directly on mineral wool or other insulation. Compression reduces the material’s thickness and can lower its thermal performance. If mineral wool is compressed to half its intended depth, it can lose a significant portion of its insulating value. A flat-looking floor may therefore leave the loft less effective at limiting heat loss.
After fitting the supports and boards, check for insulation trapped beneath a support, pressed between joists or pushed aside during installation. Correct the layout before using the floor for storage. This helps keep the insulation at its intended depth and performance across the ceiling.
Will raised loft boarding affect ventilation in my loft?
Raised boards can provide storage while keeping the loft’s airflow clear, provided the layout leaves ventilation routes open. Use these checks to plan storage, protect insulation and account for the building’s existing features.
- Decide how you’ll use the loft before planning the work. Boarding for storage is different from converting a loft into a habitable room. Simple storage boarding may not need Building Regulations approval if it involves no structural alterations and the space remains for storage.
Keep that distinction clear. Adding a floor for boxes is not the same as changing the roof structure, altering the building’s use or creating a room. Those changes can bring different requirements. Describe the intended use accurately when planning the layout, and don’t treat storage boarding as permission to make structural changes.
- Consider the structure as well as the boards. Loft timbers and ceilings must suit the intended use, even where formal approval isn’t required. A storage floor adds weight, and heavy items concentrated in one place can strain the supporting timbers.
Plan for household storage, not a gym, heavy furniture or dense loads. Spread belongings across the boarded area instead of stacking them in one corner. If the work alters structural parts, storage-only guidance may no longer apply. This is an important consideration when deciding whether the work needs further building control consideration.
- Keep Part L in mind when planning insulation. Part L of the Building Regulations covers the conservation of fuel and power. Work should not reduce a property’s thermal performance, so install boarding above the insulation and avoid leaving parts of the ceiling less protected.
Check the insulation depth across the planned area before setting the board height. A raised floor should leave the insulation in place at its intended depth, rather than compressing it beneath the boards. This matters in a storage loft because disturbed insulation can affect heat loss. Plan the supports around the existing insulation instead.
- Preserve airflow through the roof space. Before laying boards, locate existing ventilation openings and avoid covering them with boards, stored boxes or insulation. Air needs to move through the loft; blocked routes can contribute to condensation and damp.
Include the roof edges and eaves in your layout. Keep stored items away from openings, and don’t push insulation into ventilation gaps. Raised boarding leaves space beneath the floor, but the supports and boards still need to be arranged so they don’t obstruct airflow.
- Review any new-build warranty before changing the loft. New-build homes commonly have a 10-year warranty through schemes such as NHBC, Premier Guarantee or LABC. Keep the warranty paperwork and note what work you plan to carry out, especially if it involves insulation or structural timbers.
For a storage-only layout, the practical checks are the intended use, structural impact, insulation performance and clear ventilation routes. If raised support spacing or board placement is hard to plan around those features, raised boarding layouts can help you see how a storage floor may sit above insulation.
Raised loft boarding systems and loft legs
- Choose a raised support system that leaves space for the insulation beneath the loft floor. Loft legs attach to the ceiling joists, while a raised sub-frame uses timbers to lift the boards. Either can help keep insulation uncompressed, but the required height depends on the insulation already in place.
Measure the space you need before buying materials. Standard Loft Legs are 175mm tall, whilst Loft Leg XL supports are 300mm tall. These are different clearances, so compare the height with the insulation rather than assuming either option will suit every loft.
- Set out the supports across the joists before you install the boards. Keep Loft Leg supports no more than 600mm apart, and align them to match the board edges. Regular spacing helps the boards sit on their supports instead of flexing between them.
For example, standard loft boards measuring 1200mm x 320mm need support positions planned along their length and width. Larger chipboard sheets measuring 2400mm x 600mm need a layout that supports their edges and joins. Follow the board manufacturer’s fixing instructions for the specific flooring.
- Consider a timber sub-frame where individual legs don’t suit the joists or the required raised height. One approach is to run 100mm timbers across the loft joists, opposite to their direction, then fix the boards to the new frame. This creates a raised system and can leave room for insulation between the original joists.
Keep the new timbers level and position them to support board joints. Don’t arrange them in a way that traps or presses down on insulation. Check the loft floor from the hatch before fixing anything, as joists and insulation can vary across the space.
- Select flooring that suits the support layout. One recommended option is 18mm chipboard loft boards fixed to supports. Leave the specified clearance at the walls, and avoid forcing boards tightly against the roof edges or stored insulation.
Keep the boarded area to the space you need for storage. A raised loft floor doesn’t make the roof structure suitable for heavy furniture or dense loads. Keep stored items spread out, and don’t mistake a support’s test capacity of around 500kg per square metre for a safe storage allowance.
- Check the raised floor before loading it. Make sure each board is fixed securely, supports are spaced consistently and no insulation is trapped beneath the structure. Look under accessible edges for material pushed aside during installation.
Use the loft for ordinary household storage, not concentrated heavy loads. A guide recommendation is no more than 25kg per square metre. Keeping to that limit and leaving compressed insulation undisturbed can help protect the ceiling and maintain the loft’s intended storage use.
Ventilation, airflow and condensation risks
Loft boarding can contribute to condensation and damp if ventilation or insulation stops working properly. Check airflow before deciding where to place boards, supports and storage.
-
Consider Loft Ventilation and Airflow
Locate existing ventilation openings before setting out the boards. Check the eaves and roof edges, where insulation or stored boxes can obstruct airflow. Keep these routes clear when planning the storage area, and don’t push insulation into gaps that let air move through the loft.
Raised supports can leave space beneath a loft floor, but they don’t automatically preserve every airflow route. Check whether the boards or loft legs would cover an opening or create a barrier across the loft. For example, leave access around roof-edge vents instead of boarding tightly against them. Boards sitting low on the joists can still block airflow.
Keep a clear airflow path between ventilation openings. Place belongings within the boarded area, not over vents or at the eaves. If a board edge would block an opening, change the layout before fixing it. This simple check helps preserve the airflow the loft needs.
-
Assess Condensation Risks
Look for signs of condensation before installing boards. Check the underside of the roof covering, timbers and ceiling-facing surfaces for moisture, water droplets or a musty smell. These clues matter because boarding can affect how insulation and ventilation work together.
Keep insulation spread evenly and don’t compress it beneath boards. Pressed-down insulation may perform less effectively, leaving the ceiling less protected from heat loss. Warm, moist air from the home can then meet colder surfaces in the loft. Where ventilation is restricted, moisture may collect instead of escaping.
Keep existing airflow paths open and don’t store items against cold roof surfaces. For example, leave a gap between boxes and the roof lining, and keep insulation away from vents. Check these areas after boarding, especially around the eaves and roof timbers. Address visible moisture before adding storage, rather than covering a developing problem.
-
Check for Damp Risks
Before work starts, inspect the ceiling below the loft and the roof timbers for damp marks. A new patch on a bedroom ceiling or a musty smell near the loft hatch can help you identify where to look. Don’t cover damp materials with boards or stored belongings.
Check whether insulation has been moved away from the ceiling or packed into roof-edge spaces. Either can leave uneven coverage and interfere with airflow. Keep insulation in place, leave ventilation openings clear and plan the boarded area around these features. This helps avoid trapping moisture beneath a new loft floor.
After boarding, keep storage away from vents and periodically inspect accessible timbers and ceiling surfaces. A damp patch or new condensation on the roof lining needs attention, not another layer of boards. Keeping access around the hatch clear also makes it easier to inspect the loft and spot changes before boxes hide them.
Boarding over existing loft insulation
- Map the storage area you need before moving anything. Mark the route from the loft hatch and the places you want to reach regularly. For example, a clear path to suitcases or seasonal boxes may be more practical than boarding the whole loft. Focusing the boarded area also limits how much insulation and airflow you need to work around.
- Inspect the insulation across the planned area. Look for gaps, flattened sections and material pushed towards the roof edges. Keep it evenly spread, and don’t pull it out just to make a board fit. If a section is already compressed, find out why before covering it. The board layout shouldn’t lock the insulation in that condition.
- Set the boarding height so it sits above the insulation without pressing it down. A raised support frame can create space for the insulation beneath the usable floor. Check the height at several points, as insulation may sit unevenly across the ceiling joists. Arrange the supports so the boards rest securely and the insulation remains uncompressed.
Keep ventilation routes open as you plan. Don’t push insulation into roof-edge gaps or place boards over vents. A clear path around the eaves helps preserve airflow and reduce the risk of condensation.
- Finish the exposed edges of the boarded area carefully. A guide recommends attaching a 50mm upstand around exposed edges. This can help keep loose insulation from spilling onto the boarded floor. Fit it without blocking ventilation openings or pressing the insulation into a tight bundle against the edge.
Check board joins and edges as you work. If a board rocks or sits unevenly, adjust its support instead of forcing it down over insulation. A level surface is useful for storage, but not at the cost of insulation depth or clear ventilation.
- Load the finished floor carefully. Don’t concentrate heavy belongings in one spot, as overloading can make the ceiling bow. Spread storage across the boarded area and keep items away from ventilation openings. For example, place boxes across supported sections instead of stacking them heavily beside the loft hatch.
Before covering each section, check that insulation remains in place and airflow is clear. These checks help you keep the energy-saving layer working whilst creating storage. If you want help planning a boarded area above existing insulation, discuss your loft storage layout.
JR Loft Boarding: Raised loft boarding
JR Loft Boarding installs raised loft boarding to create storage space above existing insulation. It’s a practical option if you want a usable floor without removing insulation or laying boards directly on it. The layout can be planned around your loft’s insulation, joists and access needs.
If your loft needs better access, JR Loft Boarding also installs Easystow aluminium loft ladders and upgrades loft hatches and insulation. Whether you live in a new build or an established home, consider how you’ll use the boarded area and which parts of the loft need to stay accessible.
Talk to JR Loft Boarding about raised boarding for your loft.
Plan a loft floor that suits your home
Start by deciding what you need the loft to do. A clear route to stored belongings may matter more than boarding every available area. Think about how you’ll use the space, what needs to stay accessible and whether the loft hatch provides safe, practical access.
If you’re deciding whether you can board a loft without removing insulation, consider the planned use and the existing loft conditions. JR Loft Boarding installs raised loft boarding, including for new builds, as well as Easystow aluminium loft ladders. These options can help shape a storage setup around your home and access needs.
A well-planned loft floor can make everyday storage easier without losing sight of the insulation beneath it. Take the next step at a pace that feels right for your home. Contact JR Loft Boarding to discuss your loft boarding needs, and move towards a more useful loft space.
Frequently Asked Questions
A cold or warm loft?
A cold loft has insulation at ceiling level, leaving the roof space above colder than the rooms below. A warm loft has insulation closer to the roof line, keeping more of the roof space within the insulated envelope. Identify which arrangement your home has before planning boards. For example, insulation between rafters needs a different layout from insulation over the bedroom ceiling.
Can I Screw Boards Straight To Loft Joists?
Yes, but only if the insulation sits below the tops of the joists and the boards won’t compress it. Check the whole area first, as insulation depth can vary between joist bays. Also consider the joists’ condition and the intended storage load. If insulation rises above the joists, fixings straight into them will press it down beneath the boards.
What If You Have Extra-Deep Insulation?
Choose a raised floor height that clears the insulation without pressing it down. Measure the deepest areas, including places where insulation overlaps or has been topped up. For instance, a support that clears the insulation in one bay may be too short beside a roof edge. Plan supports and boards across the full loft, and keep ventilation gaps open.
What are the benefits of loft boarding and flooring?
Loft flooring creates a firmer surface for household storage and helps keep boxes off the ceiling insulation. A planned layout can also make frequently used items easier to reach from the hatch. For example, a short boarded route to seasonal decorations may be more useful than covering the whole loft. Keep the space for storage, rather than treating it as a living room.
What Happens When You Compress Insulation?
Compressed insulation becomes thinner, which can reduce its ability to slow heat escaping through the ceiling. Mineral wool compressed to half its intended depth can lose a significant portion of its insulating value. Material pushed aside during fitting can also leave uneven coverage. If boards are already laid directly over insulation, check accessible edges for flattened or displaced sections.
Can you board a loft over existing insulation in the UK?
Yes, you can board a loft without removing insulation, as long as the floor sits above it and the insulation remains uncompressed. Set the support height to clear the material already in place. Keep ventilation openings clear, and use the loft for storage rather than as a habitable room. Building regulations may apply if the work changes structural parts.
What loft legs or raised flooring systems allow boarding over insulation?
Loft legs and raised timber sub-frames can hold boards above insulation. Standard Loft Legs are 175mm tall, while Loft Leg XL supports are 300mm tall. Match the support height to the loft’s insulation and joists, rather than selecting by name alone. Supports should be no more than 600mm apart. In Glasgow and nearby areas, loft layouts can differ between homes.
How do you board a loft without removing or compressing insulation?
First, inspect the insulation and mark the vents, joists and route from the hatch. Choose supports tall enough to clear the insulation, then position them to support board edges and joins. Fit the boards without forcing them down, and check beneath accessible edges for displaced material. Finally, keep stored boxes clear of ventilation openings and spread their weight across the boarded area.


