

One ceiling light won’t suit every loft. For a sloped room, use 100 lumens per square metre as a rule of thumb, then layer the lighting to suit how you use the space. Good loft lighting ideas balance useful brightness with fittings that work under pitched ceilings.
It’s easy to focus on choosing a fitting and overlook where its light will fall. Daylight, ceiling height and dark corners all affect how comfortable and practical a loft feels.
This guide covers how to choose fittings, make the most of daylight and combine general and task lighting. You’ll also learn how to estimate the number of lights and the brightness needed, so you can plan before work begins.
Key Takeaways
- Match fittings to the room’s use and ceiling shape, and choose low-profile options where headroom is limited.
- Combine daylight with layered lighting so you can brighten darker areas and adjust the room’s feel.
- Plan light placement around sloped ceilings, storage and task areas to reduce shadows.
- Estimate brightness from the room’s floor area, then consider whether one fitting will leave corners dim.
- Raised loft boarding can help create a more practical storage space alongside your lighting plans.
1. Choosing fittings based on room use and ceiling height
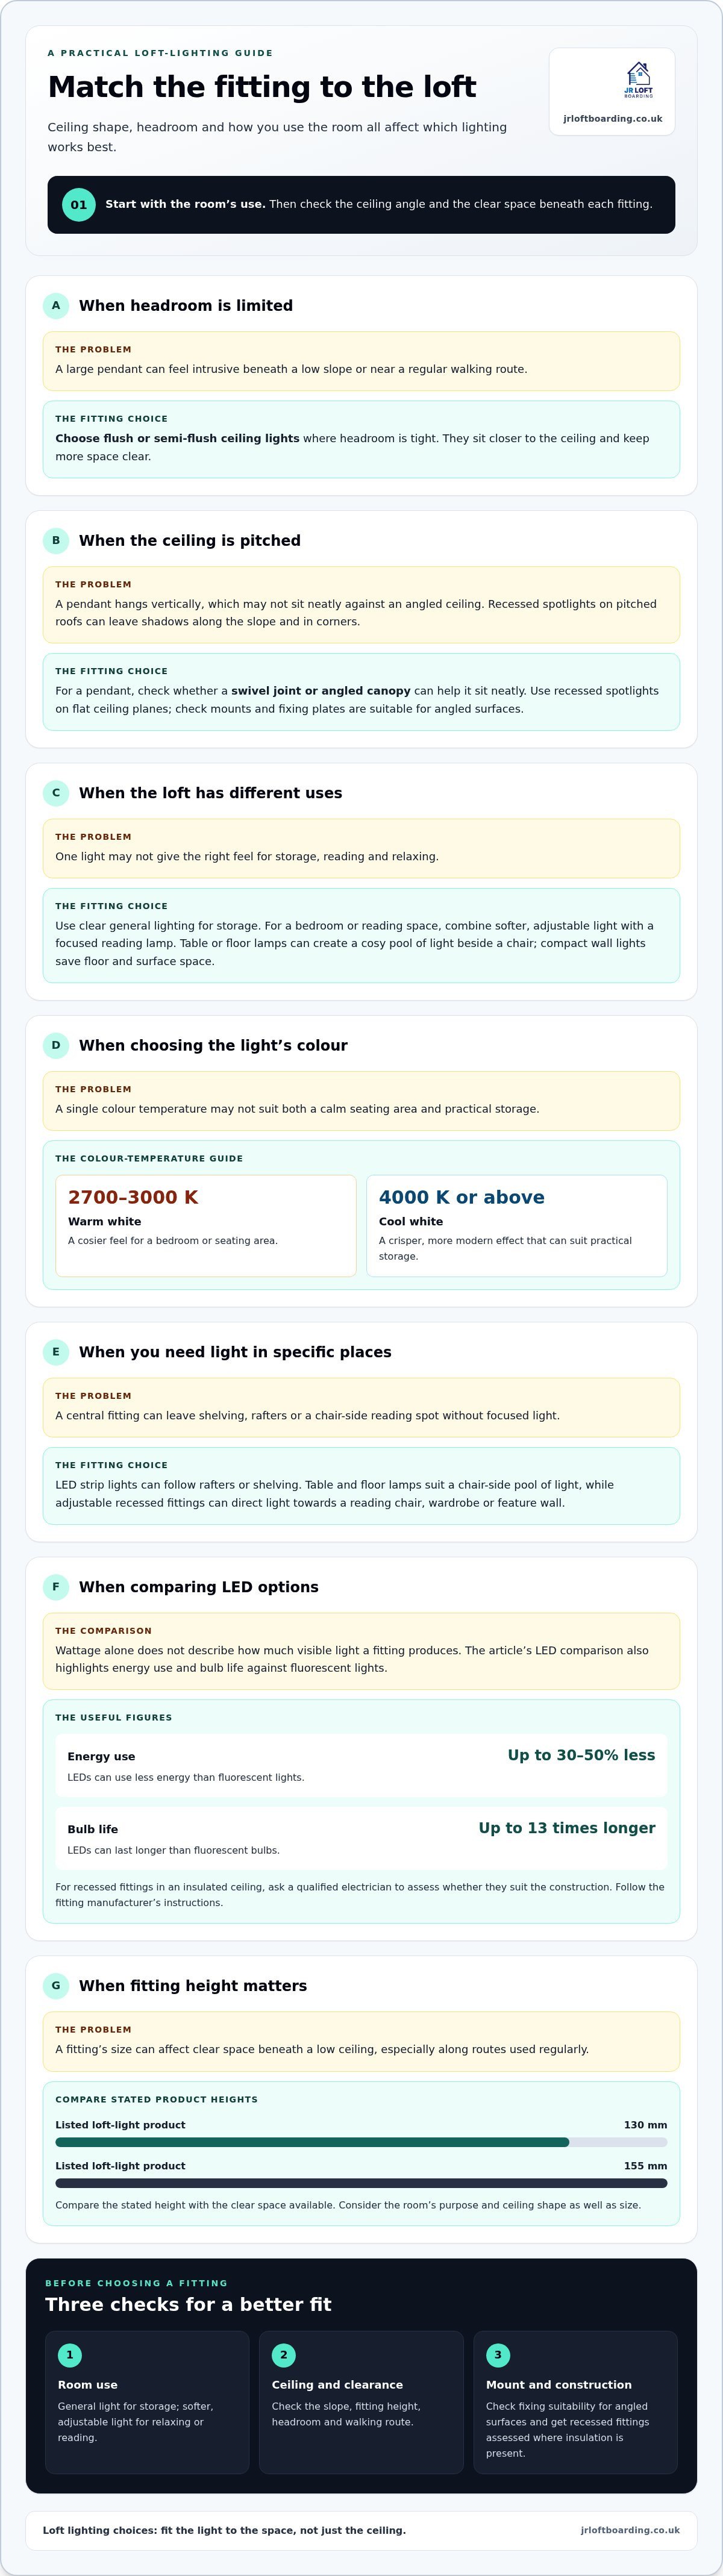
Start by deciding how you’ll use the loft. A storage area needs clear general lighting, while a bedroom or reading space may benefit from softer, adjustable light. Then check the ceiling shape and headroom beneath each fitting. A large pendant can feel intrusive beneath a low slope, whereas a flush fitting sits closer to the ceiling and keeps more space clear.
For loft conversions, flush or semi-flush ceiling lights are practical where headroom is limited. In a room with little daylight, an LED pendant can provide brighter general illumination. Check its position against the roof angle: a pendant hangs vertically, but a swivel joint or angled canopy can help it sit neatly on a sloped ceiling.
LED options include ceiling fittings, pendants and strip lights along rafters or shelving. LEDs can provide bright, energy-efficient light and use up to 30-50% less energy than fluorescent lights. They can also last up to 13 times longer than fluorescent bulbs. Follow the fitting manufacturer’s instructions, and choose a mount or fixing plate suited to the ceiling surface.
Match colour temperature to the task. Warm white at 2700-3000 K creates a cosier feel for a bedroom or seating area. Cool white at 4000 K or above gives a crisper, more modern effect that can suit practical storage. For example, warm ceiling light with a focused reading lamp can serve a bedroom better than one harsh, cool fitting.
Recessed spotlights can suit lofts with limited headroom because they sit within the ceiling. They work best on flat ceiling planes; on pitched roofs, they may leave shadows along the slope and in corners. In an insulated ceiling, a qualified electrician can assess whether recessed fittings suit the construction.
Choose fittings to suit the room’s layout. Strip lights can follow rafters or shelving in a pitched loft, while table and floor lamps create a cosy pool of light beside a chair. Compact wall lights save floor and surface space. A statement fitting can add visual interest, provided it stays clear of the walking route.
- Choose low-profile fittings where headroom is tight.
- Use LED strips to light shelving or rafters.
- Consider warm white for relaxing spaces and cool white for practical areas.
- Check ceiling angle, insulation and fitting instructions before installation.
Product dimensions are another check when headroom is limited: one listed loft-light product has a height of 130 mm, while one listed loft-light product has a height of 155 mm. Compare the fitting’s stated height with the clear space available beneath the ceiling, especially around routes used regularly, before choosing between options. Consider the measurement alongside the room’s purpose and ceiling shape, so the fitting is not selected by size alone.
Rechargeable light fittings do not require electrical installation and can provide additional lighting. They may be considered when extra illumination is needed without adding an electrically installed fitting. For ceiling lights on angled surfaces, check that the mounts and fixing plates are suitable for the angle before installation. A compatible mount helps the fitting sit appropriately on the ceiling.
2. Recessed and natural lighting
Start by noticing how daylight reaches the loft. A roof window may brighten the floor beneath it while the far end of a long room stays dim. Stand at the entrance during daylight and note where the brightest patch falls. Then identify reading spots, wardrobes and work surfaces that need extra light after sunset. This walk-through helps you plan fittings around the whole room, rather than relying on one central point.
Daylight changes throughout the day, so dimmers can help you adjust electric lighting to match. Lower the ceiling lights on a bright afternoon, then raise them as dusk falls. Dimming can also shift a space from a bright area for sorting belongings to a calmer reading corner. Choose compatible dimmer controls and fittings so the lights respond properly.
Recessed downlights keep the ceiling line clear, which can make a low room feel less crowded. Adjustable versions can direct light towards a reading chair, wardrobe or feature wall. Aiming a fitting at a pale wall can spread reflected light, while directing it towards a shelf makes stored items easier to see. Use recessed fittings on flat ceiling planes; on a pitched roof, they may leave shadows along the slope and in corners.
Lumen output gives a useful way to compare panel lights. A slim flat recessed round LED panel rated at 24W produces 2200 lumens. Another rated at 18W produces 1600 lumens. These examples show why wattage alone does not describe how much visible light a fitting produces. Compare the lumen figure with the area and task, then consider whether light will be blocked by beams, furniture or stored boxes.
Insulation affects the space available around a ceiling fitting. A qualified electrician can assess whether recessed lights suit the ceiling, particularly where insulation is present. Plan fitting positions before plastering and insulation work is complete, as later access to wiring can be limited. Consider the direction of the light, too: a downlight over a wardrobe should illuminate the door and shelves, not just the floor in front.
- Map daylight patches and darker corners before choosing positions.
- Use dimmers to adjust electric light as daylight shifts.
- Compare lumen output, not wattage alone, when assessing panel lights.
- Plan recessed fittings around ceiling construction and insulation.
If lighting forms part of a broader storage plan, explore loft storage options alongside your layout.
A loft conversion’s lighting scheme can combine daylight with electric fittings. As daylight changes, dimmers let you adjust the electric light in the room. Adjustable recessed downlights offer another option: tilt them towards a reading area, wardrobe or feature wall to direct light where it is needed. This lets you tailor lighting to the different uses of each area.
3. Track lighting, spotlights and wall lights
Layered lighting can make a small loft feel brighter and more spacious by spreading light across different surfaces. Combine ceiling track lights with wall lights or a reading lamp, so one central fitting doesn’t leave the edges gloomy.
Track lighting suits a loft where one ceiling point needs to serve several areas. Aim one head at a desk, another at shelving and a third towards a darker corner. This directs light where it helps without requiring separate ceiling fittings for every task. A track can also follow the room’s main route, lighting the way between the hatch, storage and seating.
Before positioning a track, sketch the furniture and storage layout. Mark where a chair, desk or shelving unit will go, then point each adjustable head towards its target. For example, angle one head across a desk rather than straight down onto its centre. This can reduce screen glare and make the work surface easier to use.
Spotlights can highlight a feature such as a picture, exposed beam or display shelf. Aim them deliberately: a beam directed at a pale wall can spread reflected light into a dim area, while one aimed at a dark object creates a sharper pool. Avoid placing a spotlight where its beam shines directly into someone’s eyes.
Compact wall lights save space in a loft conversion. They keep bedside tables and narrow walkways clear, which is useful where roof slopes limit floor space. Place a wall fitting beside a reading chair or near a bed, and check that it lights the task without shining across the room. A pair on opposite walls can help balance an uneven layout.
Give each lighting layer a clear purpose instead of switching on every fitting at once. Use track lights for general coverage, a spotlight for a display or work area, and a wall light for softer local illumination. Separate controls make it easier to choose the right combination. For example, use focused light at a desk while working, then switch to a gentler wall light later.
- Sketch furniture and storage before marking track positions.
- Aim adjustable heads at useful surfaces, not directly at people.
- Use compact wall lights where tables or walkways need to stay clear.
- Choose separate controls for general, task and softer lighting.
4. Choosing the number of loft lights
Start with how you’ll use the loft, then map the light across its floor plan. One fitting may be enough for basic storage, while a room with a desk, seating and shelving needs light in each area. Mark the entrance, walking route and places where you handle belongings. This helps show whether a central light reaches the parts of the loft you use.
For a UK loft measuring around 10-15 m² and used for basic storage, one bright loft light may be sufficient, though some areas may remain shadowed. A fitting near the centre can leave boxes beside the eaves difficult to see. Add another light where the roof slope, stored items or a partition blocks the first fitting’s reach.
Count useful lighting positions, not just fittings. One track with adjustable heads can direct light towards several areas. Separate fittings may work better if a wall or roof structure divides the room. For example, plan one light near the access point and another towards shelves at the far end. Walk through the layout and note any areas left in shadow.
Use this practical planning sequence:
- Sketch the loft outline and mark the hatch, beams and storage.
- Mark the main route from the entrance to the items you use.
- Place a light position over each area needing clear visibility.
- Review the plan for shadows behind stored boxes or partitions.
The number of fittings alone doesn’t show whether a layout will feel comfortable. A bright central fitting can cause glare below it while leaving corners dim. Several lower-output sources spread around the room can distribute light more evenly. Choose positions according to where the light falls, and account for roof slopes that interrupt its path.
For new builds, plan light positions before the ceiling is closed. Wiring routes and fitting locations are easier to coordinate during construction than after plastering and insulation limit access. Mark positions on the room plan and give each a purpose, such as lighting storage or a work surface. For recessed fittings, a qualified electrician should assess whether they suit the ceiling, particularly where insulation is present.
UK electrical safety requirements depend on the work and the building. Have a qualified electrician assess the wiring, ceiling construction and fitting instructions, especially for recessed lights in insulated ceilings.
Installation costs depend on the fitting type, wiring access, ceiling construction and number of lights. Request a quote for the work.
5. Estimating the amount of light needed
Use floor area to make a first estimate for a loft with sloped or angled ceilings. A useful rule of thumb is 100 lumens per m². Multiply the room’s area in square metres by 100 to estimate its total light output. This gives you a starting point for comparing fittings, rather than relying on wattage alone.
For example, a loft room measuring 5 metres by 6.5 metres has an area of 32.5 m². At 100 lumens per m², it needs 3,250 lumens in total. Add together the lumen outputs of the planned fittings to see how their combined output compares with that estimate. The result is a planning guide, not a count of lights.
Use this simple calculation before choosing fittings:
- Measure the room’s length and width in metres.
- Multiply those measurements to find its floor area.
- Multiply the area by 100 lumens per m².
- Compare that total with the combined lumen output of your fittings.
One fitting can provide enough light overall yet still leave parts of a loft dim. Beams, roof slopes, shelving and stored boxes can interrupt the light. A central fitting may illuminate the floor below while casting a shadow behind shelving. Use a room plan to check where the light will fall, then spread fittings across separate areas where needed.
Think about the tasks done in each part of the room. A loft used for occasional storage needs clear visibility along the route and around stored items. A room with a desk or reading chair also needs useful light on those surfaces. Direct adjustable fittings towards the task, and use general lighting to help people move safely through the space. As daylight changes, consider how the room will look after dusk.
Compare lumen output rather than wattage when selecting LED fittings. For reference, a slim recessed panel rated at 24W produces 2200 lumens, while an 18W panel produces 1600 lumens. Several fittings can share the required total, which helps distribute light more evenly. Check each fitting’s position against roof angles and obstructions before installation.
Use your estimate to plan light alongside the loft’s storage layout. Plan your loft storage layout around the areas that need clear visibility, including access routes and shelving.
JR Loft Boarding: Raised loft boarding
JR Loft Boarding installs raised loft boarding to create a practical storage surface above the insulation. This helps you organise boxes and keep the route through the loft clear, making it easier to plan lighting around access points and stored items.
When planning a loft for storage, consider how raised boarding, the hatch and ladder work together. A clear layout helps you decide where light needs to reach, including the entrance, walking route and shelving. JR Loft Boarding also installs loft hatches and insulation, as well as Easystow aluminium loft ladders.
To discuss raised loft boarding for your home, contact JR Loft Boarding.
Make a plan that works for your loft
The best loft lighting ideas start with how you’ll use the space, not with a fitting chosen in isolation. Before making changes, sketch the layout and mark where storage, access and everyday tasks will be. This gives you a practical plan to work from as the loft takes shape.
If storage is part of your plan, JR Loft Boarding installs raised loft boarding, including solutions for new builds. Easystow aluminium loft ladders can also make access easier. These services help create a usable loft, while your lighting layout should reflect how you intend to use the room.
Bring your layout and storage needs together before work begins. Contact JR Loft Boarding today to discuss raised loft boarding and make a confident start on your loft plans.
Frequently Asked Questions
What are the best lighting ideas for a loft conversion?
The best plan combines general lighting with separate illumination for specific tasks. Useful loft lighting ideas include lighting the route from the stairs or hatch, then adding a reading light beside a bed or chair. In Glasgow, Airdrie, Motherwell, Paisley, Hamilton, Bishopbriggs, Newton Mearns, East Kilbride and Cambuslang, the room layout and roof shape will guide your fitting choices.
How should lighting be planned for a loft with sloped ceilings?
Plan around changes in ceiling height rather than treating the loft as one flat space. Mark low sections, beams and the areas where you stand, sit or reach for belongings. Keep fittings clear of doors and the usual walking route. For example, place a task light beside a low desk, where you can work seated without standing beneath the slope.
Which ceiling lights work best in loft bedrooms and living spaces?
Flush or semi-flush ceiling lights suit bedrooms and living spaces with limited headroom. Choose a fitting that spreads light across the room without shining directly into a bed or seating area. In a bedroom, place the main light outside the pillow’s direct line of sight. In a living area, consider how the fitting looks from the sofa as well as from the doorway.
What are the best pendant and wall lighting ideas for loft rooms?
A pendant can draw attention to a central dining table or seating area, while wall lights provide local illumination without using table space. In a narrow room, position wall fittings beside reading or seating spots rather than along the main passage. Check the pendant’s position from standing and seated viewpoints so it doesn’t obstruct sightlines across the room.
How can roof windows and natural light be combined with artificial lighting in a loft?
Use roof windows to guide where you place artificial light. A desk beside a window may need less electric light during bright hours, while a wardrobe in a shaded corner still needs its own source. Check the room at different times of day, including when daylight falls across screens or glossy surfaces. This helps prevent reflections and keeps the loft useful after the natural light fades.


