
A boarded loft is only useful if the floor is properly supported and insulation, wiring and light fittings remain protected and accessible. Whether you can board your loft yourself depends on the loft’s layout, your DIY skills and what you plan to store. DIY is generally better suited to a straightforward space and light storage.
It’s understandable to see boarding as a simple way to create more storage at home. For simple boarding intended only for light storage, Building Regulations approval isn’t always required in the UK. Even so, safe access, suitable support and preserving the insulation all matter.
This guide explains how to judge whether the job suits you, why a raised floor can preserve insulation depth, and how to plan around cables, pipes and fittings. It also covers the risks of fixing boards directly to ceiling joists, so you can choose a practical approach for your loft.
Key Takeaways
- Choose DIY boarding only if the loft is straightforward, you’re confident working in it and you’ll store light items.
- Plan support carefully: ceiling joists may not be designed to carry heavy or concentrated loads.
- Use board sizes that suit the hatch, and leave access to wires and light fittings.
- Keep insulation from being compressed by considering a raised system that preserves space beneath the boards.
Can You Board Your Loft Yourself?
DIY boarding may suit a confident homeowner with a straightforward loft and plans for light storage. For simple boarding intended only for light storage, Building Regulations approval isn’t always required in the UK, but safe access and careful installation remain essential.
-
Assess DIY installation suitability
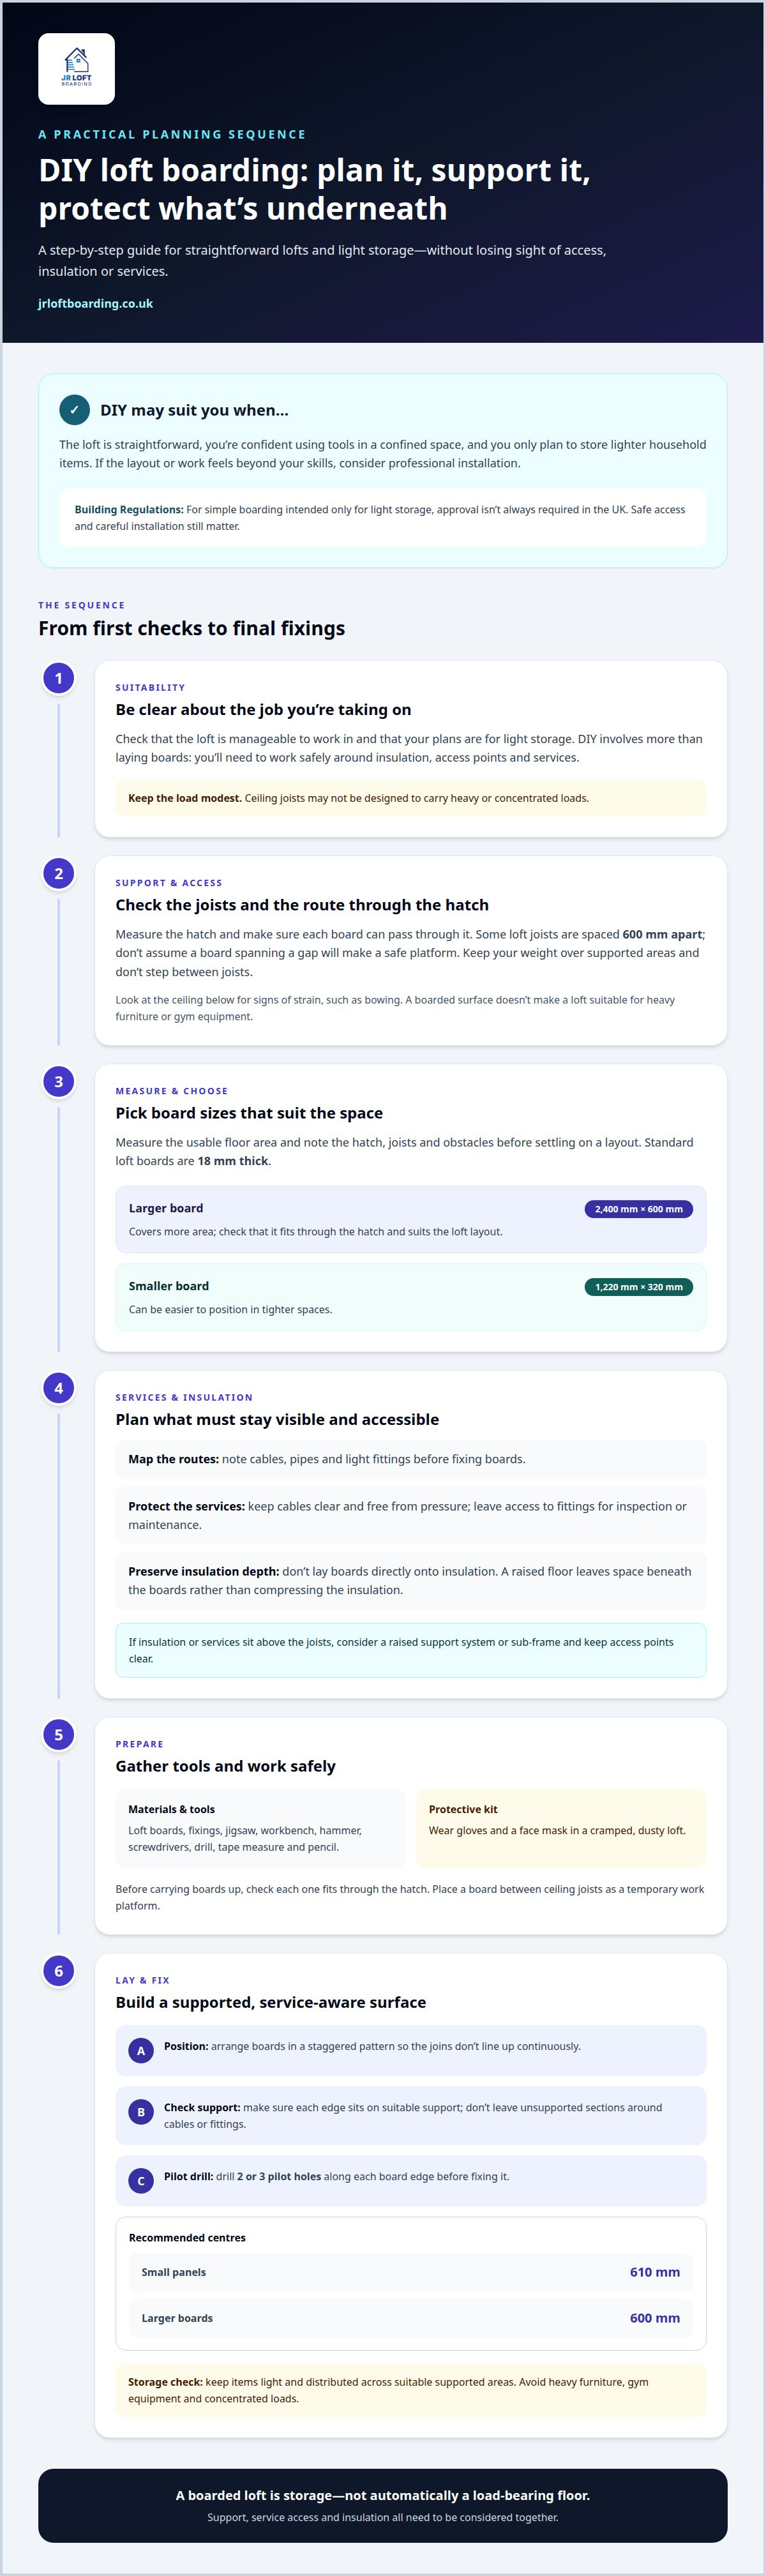
First, assess whether the loft is straightforward to work in and whether you only need storage for lighter household items. DIY is more suitable if you’re comfortable using tools in a confined space and can plan around insulation and services. Don’t assume ceiling joists are designed to carry heavy or concentrated loads. If the layout or work feels beyond your skills, consider professional installation.
-
Prepare materials, tools and installation steps
Gather loft boards, fixings, a jigsaw, workbench, hammer, screwdrivers, drill, tape measure and pencil. Wear gloves and a face mask in a cramped, dusty loft. Before carrying boards up, check that each one fits through the hatch. Place a board between ceiling joists as a temporary work platform, then lay the loft boards in a staggered pattern so the joins don’t line up. Drill 2 or 3 pilot holes along each board edge before fixing it. Keep wires clear as you work. The recommended centres are 610mm for small panels and 600mm for larger boards.
-
Compare DIY and professional installation
DIY may suit you if the loft is simple, the intended storage is light and you can complete each fixing carefully. The job involves more than laying boards: access through the hatch, tools, insulation and service routes all affect the work. Professional installation can help when you want a planned storage setup or the layout makes DIY difficult. A raised floor creates space beneath the boards for insulation.
Risks of boarding directly onto ceiling joists
Fixing boards directly to joists can create storage space, but ceiling joists aren’t automatically suitable as a floor. Check the support and access before laying boards or storing items.
-
Check joist and loft access suitability
Start by looking at the joists and the route through the loft hatch. Boards must fit through the hatch, and the working area must let you position them without stepping between joists. Some loft joists are spaced 600mm apart, leaving wide gaps between supports. Don’t assume a board spanning that gap will provide a safe platform. Keep your weight over supported areas while assessing the space.
- Consider how you’ll use the loft, not just how much floor you can cover. Standard lofts in UK homes are generally not designed as living rooms or to carry heavy furniture, gym equipment or concentrated loads. A few light boxes spread out are different from several heavy containers stacked together. Keep storage modest and distribute items across suitable supported areas.
-
Consider structural loading risks
Before boarding directly onto joists, consider what the timbers are designed to support. Ceiling joists carry the ceiling below, and heavy items concentrated in one place can overload timbers that weren’t designed as a floor. This may contribute to ceiling or structural damage. A boarded surface doesn’t mean the loft is suitable for furniture or gym equipment.
- Plan the storage layout around the joists and your intended use. Don’t add extra weight to a section showing signs of strain, such as a bowed ceiling below. If the proposed storage needs a different support arrangement, a raised setup can provide space between the insulation and floor. Explore raised loft boarding options as a way to plan storage without simply laying boards onto ceiling joists.
Choosing loft boards and preserving service routes
Standard loft boards are 18mm thick, with common sizes of 2,400mm x 600mm and 1,220mm x 320mm. Plan their positions around wires, light fittings and other service routes before fixing them.
- Measure the usable floor area and note where cables, pipes and light fittings run before choosing board lengths. Plan the layout to keep equipment accessible for inspection or maintenance. Don’t cover a service route simply because it falls beneath a convenient board edge.
- Choose board dimensions that suit the joists and the shape of the loft. The larger 2,400mm x 600mm board covers more area, whilst the 1,220mm x 320mm size can be easier to position in tighter spaces. Both listed sizes are 18mm thick. Cut boards to fit around obstacles rather than forcing them over services.
- Keep the tops of light fittings accessible. Mark their positions on the boards and leave clear openings rather than trapping fittings beneath the floor. Keep cables visible and free from pressure as you lay boards, since pinched wires can be damaged.
- Arrange boards in a staggered pattern, so the joins don’t form one continuous line. This helps create a more even surface across the boarded area. Check each edge sits on suitable support, and avoid leaving unsupported sections around a cable route or light fitting.
- If insulation or services sit above the joists, consider a raised support system or sub-frame. This lifts the boarded surface and leaves space beneath it instead of pressing boards onto the insulation. Plan around existing service routes and keep access points clear for future work.
Can loft boards be laid directly over insulation?
Don’t lay boards directly onto insulation. A raised floor should sit above the insulation, preserving its intended depth rather than compressing it.
- Look at the insulation before choosing a boarding method. Loft insulation needs space to retain its thickness, so boards resting directly on top can squash it beneath their weight. A flattened layer provides less effective insulation than one left loose. Avoid using the insulation itself as a base or support for stored items.
- Check whether the insulation fills the gaps between the ceiling joists or extends above them, as this affects the clearance needed for a raised floor. A raised loft leg system or sub-frame supports the boards above the insulation. Keep insulation evenly spread and avoid blocking airflow around the roof space.
- Plan the support height and board layout together. A floor set too low may press against the insulation, while a poorly planned layout can obstruct access to cables or light fittings. Mark the storage area first, keep routes and fittings reachable, and leave space around them rather than packing insulation tightly into every gap.
- Before boarding, look for signs that the insulation has been disturbed or flattened. One homeowner reported damp and mould in two rooms after loft insulation had been disturbed. That report doesn’t establish the cause, but it underlines the need to handle insulation carefully. Covering a compressed patch won’t restore its intended depth.
- Choose a raised arrangement if you need both storage and insulation beneath the boards. Loft legs or a raised sub-frame create a supported platform with a gap underneath. For help planning loft insulation and boarding, get in touch before covering the insulation.
Keep the insulation at its intended, uncompressed depth beneath the boards. Set the raised supports high enough to preserve that space.
JR Loft Boarding
JR Loft Boarding can plan and install a practical loft storage setup when direct boarding could obstruct service access or leave too little room above the insulation. Its raised loft boarding sits above the insulation, preserving its depth. Loft hatches and insulation can also form part of a wider storage plan.
Consider professional installation if your loft has awkward access, uneven joists or services that need careful planning. A suitable layout depends on the loft’s structure, insulation and intended use, not simply on covering the largest area. JR Loft Boarding provides raised loft boarding for new builds and established homes.
If you’d like to discuss a safe, workable setup, contact JR Loft Boarding.
Choose a setup that suits your plans
If you’re still deciding whether you can board your loft yourself, think beyond the installation. Consider how you’ll use the space and whether it will remain practical as your household’s needs change. Storage should be easy to access and use over time.
JR Loft Boarding installs raised loft boarding, including for new builds, and fits Easystow aluminium loft ladders. These services can help make loft storage more accessible and useful. The right setup depends on your home and how you plan to use the space.
Talk through your plans and contact JR Loft Boarding about a suitable next step. A considered setup can help you make better use of the space with confidence.
Frequently Asked Questions
Do You Need Building Regulations Approval?
Simple loft boarding for light storage does not always need formal Building Regulations approval in the UK. The situation changes if you convert the loft into a habitable room, alter structural beams, or install a staircase, fire doors or escape routes. Those changes bring building control into the picture. Storage boarding should not be treated as permission to turn a loft into living space.
What tools do I need?
You’ll need a drill, jigsaw, workbench, hammer, screwdrivers, tape measure and pencil. Use the workbench to cut boards safely, and measure carefully when planning cuts around the hatch. Wear gloves and a face mask in a dusty loft. Keep tools and fixings within reach to avoid repeatedly moving across the joists.
Can I board my loft myself in the UK?
Yes, DIY boarding can suit a confident person with a straightforward loft and plans for light storage. The key question is whether you can work safely around the joists, insulation and services without rushing. The same checks apply in Glasgow, Airdrie, Motherwell, Paisley, Hamilton, Bishopbriggs, Newton Mearns, East Kilbride and Cambuslang. Consider professional installation if the layout feels complex.
What tools and materials are needed to board a loft?
Allow for loft boards, suitable fixings, a drill, jigsaw, hammer, screwdrivers, tape measure, pencil and workbench. Gloves and a face mask help protect you from dust. If insulation extends above the joists, raised supports can carry the boards while preserving the insulation’s depth. Check that the boards will pass through the hatch before taking them into the loft.
How do you board a loft safely step by step?
First, plan the storage area and identify joists, wires and fittings. Next, prepare the boards and confirm they pass through the hatch. Use a board between joists as a temporary platform, then fix boards across supported areas in a staggered layout. Drill pilot holes before fixing each edge, and keep cables clear. Finish by checking that the surface feels secure before placing light items.
How can you avoid damaging ceiling joists, wiring and pipes when boarding a loft?
Keep boards supported by joists, and don’t cut or alter structural timbers to make them fit. Note visible cables and pipes before positioning boards or drilling for fixings. Leave access around light fittings and service routes, and don’t trap cables beneath board edges. If a route disappears under insulation or can’t be followed safely, leave that area unboarded until its position is clear.


