

Could adding more loft insulation create problems if you use the space for storage? It’s a fair concern, especially when existing insulation is tucked beneath stored items or level with the joists. If you’re asking “how much loft insulation depth do I need?”, 270mm is the current recommended UK target for many homes, but reaching that depth is only part of the job.
You’ll also want to check what’s already in place before topping it up, and make sure insulation isn’t blocking the airflow your roof needs. A quick look from the loft hatch can be misleading, so it helps to measure the material in a few clear spots and check for thinner areas.
This guide explains the 270mm target, how to assess your existing insulation and what to consider before adding more. We’ll also look at ventilation and storage, including how raised loft flooring can make room for insulation without squashing it. That way, you can plan a practical upgrade that keeps your loft useful and your insulation working as intended.
Key Takeaways
- For many UK homes, 270mm is the recommended loft insulation target, but the right depth can depend on the material and its thermal performance.
- To answer “how much loft insulation depth do I need?”, compare your measured insulation with current guidance and note any thin or uneven areas.
- Measure gently and take care in the loft. Don’t step between joists or disturb wiring, stored items or roof materials.
- More insulation can help, but its performance also depends on ventilation, moisture control and careful installation.
- If you’re planning loft storage, raised flooring can create space without compressing the insulation beneath it.
Loft insulation depth needed for a typical UK home
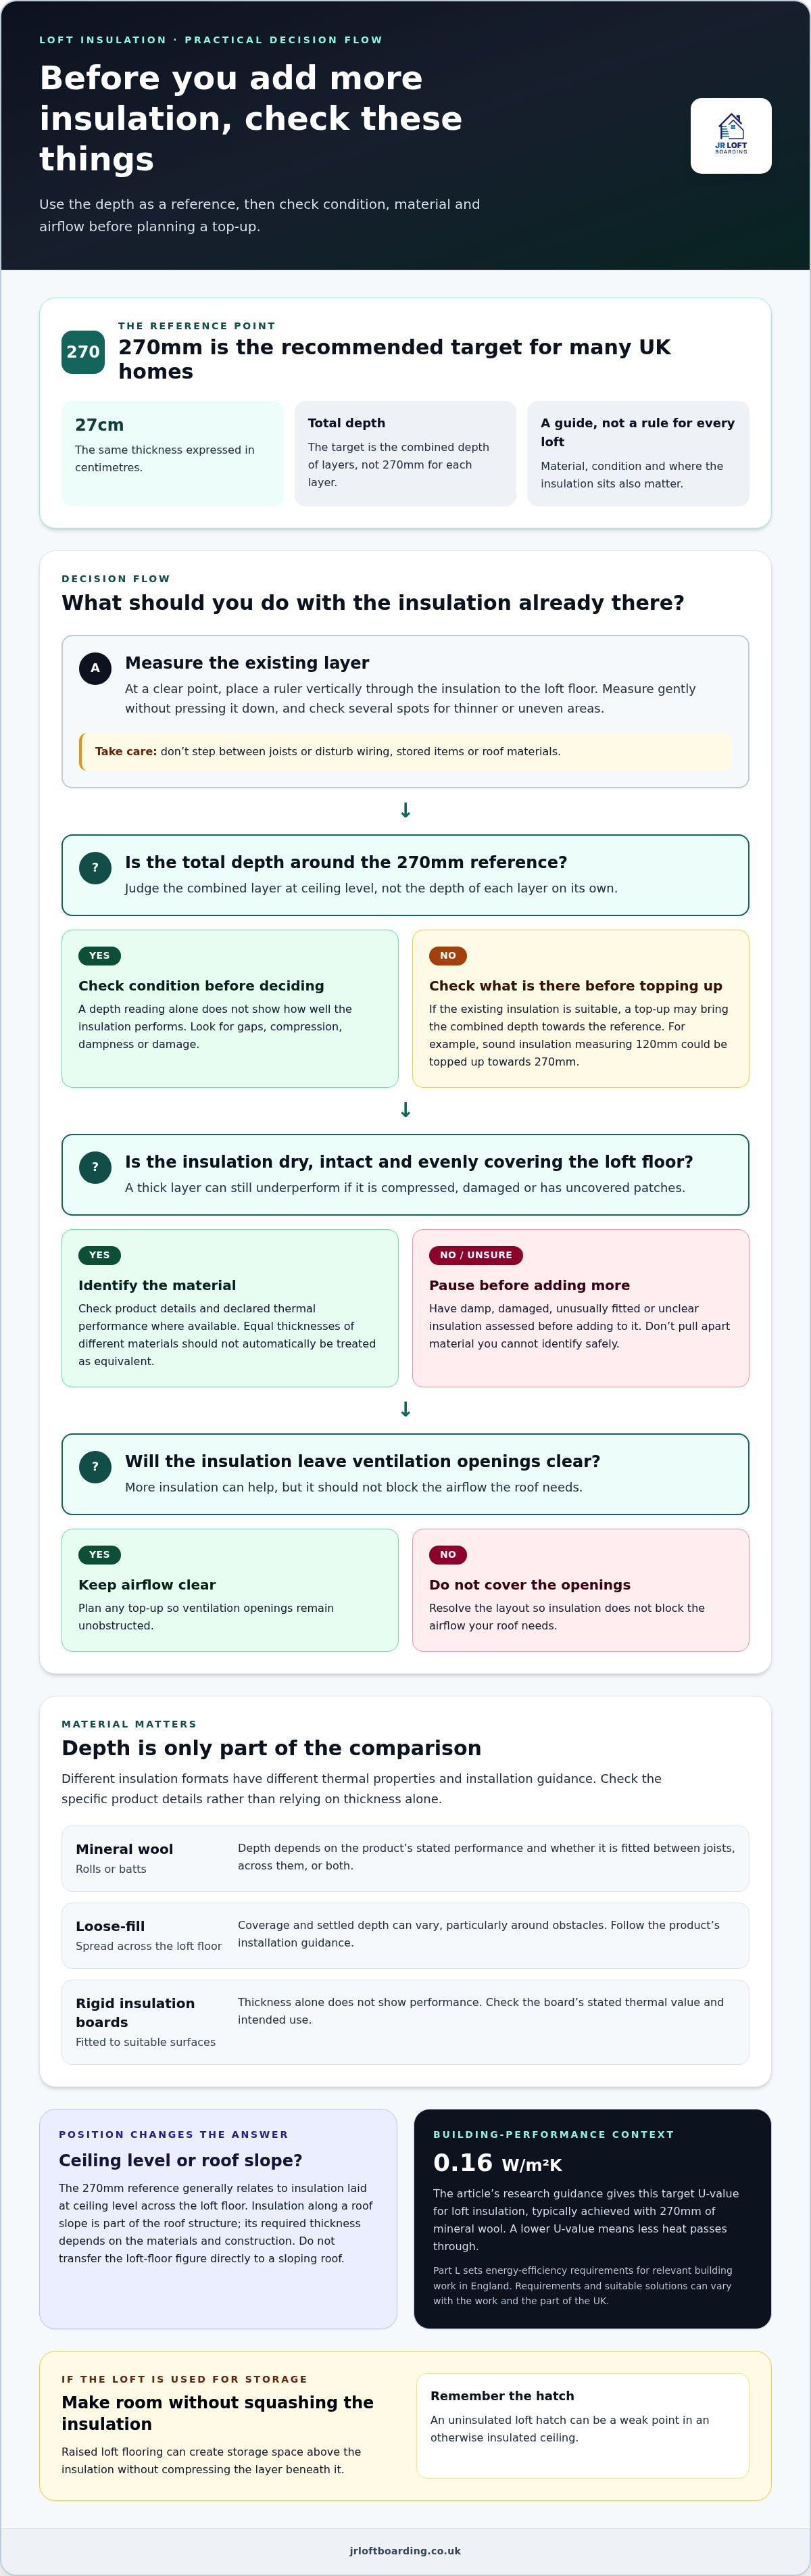
If you’re wondering “how much loft insulation depth do I need?”, 270mm is the current recommended target for many UK homes. Energy Saving Trust guidance commonly uses this depth for loft insulation, and the recommendation was checked against current guidance in October 2026. Treat it as a useful reference, not a guarantee that every loft needs exactly the same build-up. The right approach also depends on what’s already there and where the insulation sits.
What does the recommended depth mean?
Millimetres, written as mm, measure thickness: 270mm is 27cm. The target refers to the total insulation depth, not 270mm for each layer. For example, if sound existing insulation measures 120mm, a suitable top-up would bring the combined depth towards 270mm. The material’s thermal performance matters too. Thermal insulation explains how materials resist heat flow, often described using U-values and R-values.
Measure gently at an accessible, clear point. Place a ruler vertically through the insulation until it reaches the loft floor, without pressing the material down. Check several spots, as depth can vary around the loft. A top layer laid across the joists can add to the existing layer, but don’t assume the full target is present just because the insulation looks deep in one place.
The 270mm reference generally relates to insulation laid at ceiling level, across the loft floor. Insulation fitted along the roof slope is in a different position and forms part of the roof structure. Its required thickness depends on the materials and construction used, so the loft-floor figure shouldn’t be transferred directly to a sloping roof.
Does the same depth suit every home?
Not always. A newer home may already have a deeper layer, whilst an older loft may have thin, uneven or disturbed insulation. Material type and condition matter as well as depth: damp, compressed or damaged insulation may not perform as expected. Check what is in place before planning a top-up, rather than simply adding another layer everywhere.
For context, Part L of the Building Regulations sets energy-efficiency requirements for relevant building work in England. The research guidance gives a target U-value of 0.16 W/m²K for loft insulation, typically achieved with 270mm of mineral wool. A U-value describes how readily heat passes through a building element; a lower figure means less heat passes through. Requirements and suitable solutions can vary with the work and the part of the UK.
In Scotland, local building standards may affect work to a home, so consider the project as well as the insulation depth when planning changes. Also check the loft opening: an uninsulated hatch can be a weak point in an otherwise insulated ceiling. This insulated loft hatch guide explains what to look for. A clear picture of the existing insulation, its condition and the loft layout makes the next step easier to judge.
Which loft insulation details affect the depth you need?
The answer to “how much loft insulation depth do I need” depends partly on the material already in your loft. A depth measurement tells you how thick the insulation is, but not by itself how well it slows heat loss. Materials have different thermal properties, so two layers of equal thickness may not perform equally. Check the product details where available, especially if the insulation type is unfamiliar or mixed.
Do different insulation materials need different depths?
Mineral wool rolls are commonly laid between and across ceiling joists. Other formats, such as loose-fill and rigid boards, are installed differently and have their own product performance figures. Don’t assume that a thinner layer of one material will match a thicker layer of another. Compare the declared thermal performance and installation guidance for the specific material, rather than relying on a general depth comparison.
This table gives a practical starting point. It isn’t a substitute for the manufacturer’s instructions or an assessment of the loft.
| Material | Typical format | Depth caveat |
|---|---|---|
| Mineral wool | Rolls or batts | Depth depends on the product’s stated performance and whether it’s fitted between joists, across them or both. |
| Loose-fill insulation | Loose material spread across the loft floor | Coverage and settled depth can vary, particularly around obstacles. Follow the product’s installation guidance. |
| Rigid insulation boards | Boards fitted to suitable surfaces | Thickness alone doesn’t show performance. Check the board’s stated thermal value and intended use. |
For example, a measured layer of mineral wool and a board of the same thickness shouldn’t automatically be treated as equivalent. Use the material’s product information to understand its performance and whether it suits the location. Avoid mixing or adding unfamiliar materials without first understanding what is already installed.
Why does insulation condition matter?
Even a substantial layer can underperform if it has gaps, is compressed or doesn’t cover the ceiling evenly. Compression reduces the material’s thickness, while uncovered patches leave routes for heat to escape. Dampness or damage can also affect its condition. Look for signs of uneven coverage, but don’t pull apart material or disturb anything you can’t identify safely.
Keep ventilation openings clear, and don’t cover electrical equipment or wiring with insulation. If existing material is damp, damaged, unusually fitted or unclear, have it assessed before adding more. A top-up is most useful when it suits the insulation already present and can be fitted without blocking airflow or creating unsafe access.
If you’re combining an insulation top-up with storage, plan the floor so it doesn’t squash the insulation. JR Loft Boarding’s raised loft flooring is designed to create storage without compressing the layer beneath it.
Can you have too much loft insulation?
Adding insulation beyond the usual target isn’t automatically harmful. Depth alone doesn’t decide whether a loft is safe or effective. The key is whether the insulation suits the roof construction and is fitted without blocking ventilation, trapping moisture or creating problems with access. A well-planned top-up can improve the ceiling’s thermal performance; a poorly planned one can leave other issues unaddressed.
- Potential benefits: More insulation may reduce heat passing through the ceiling if the existing layer is thin and the added material is suitable.
- Things to consider: Insulation mustn’t cover ventilation openings, become compressed beneath stored items or conceal damp and damage that need attention.
How do ventilation and moisture fit into the picture?
Roof spaces need suitable airflow for their construction. Insulation should not block eaves vents or other ventilation paths. Guidance for some roof arrangements refers to keeping a clear gap between the insulation and roof deck, but the detail depends on the roof design. Don’t assume the same gap suits every loft. The Scottish Government’s Building Standards Technical Handbooks address ventilation and condensation in building work in Scotland.
Condensation can form when moist air meets a cold surface, but signs such as damp patches or mould don’t identify the cause on their own. Poor ventilation may be one factor; a leak or another building issue may also need attention. If you find persistent damp, mould, water staining or a suspected leak, get the property assessed before covering the area with more insulation. A top-up shouldn’t be used to hide a problem.
Before work, look for vents and other openings, but don’t move wiring or interfere with electrical equipment. Keep insulation clear of these features, and avoid disturbing unfamiliar materials. If the roof layout or existing installation is unclear, pause and get it assessed rather than guessing where extra insulation should go.
Does deeper insulation affect loft storage?
It can. If boards sit directly on the ceiling joists, they may press down on insulation laid between them. That compression reduces its thickness and can undermine the intended performance. Adding insulation may also leave too little clearance for boards placed at the existing floor level.
Raised loft flooring creates a higher surface for storage, leaving room for insulation below without squashing it. The right arrangement depends on the loft and how you plan to use it. Raised loft boarding explains how storage can be planned alongside insulation.
So, if you’re weighing up how much loft insulation depth do I need, consider the whole roof space, not just the ruler reading. Insulation top-ups and raised flooring can be planned together to support warmth and practical storage. If your loft needs both, JR Loft Boarding’s insulation and flooring options offer a practical place to start.
How can you check your existing loft insulation depth?
A quick inspection can show whether your insulation is broadly near the recommended target, but safety comes first. Don’t climb into a loft unless you can reach and inspect it safely. Never step between the joists, where you could damage the ceiling below. Use an existing boarded walkway if there is one, and don’t shift stored items, wiring or roof materials to get a clearer view.
Work through these checks in order:
- Prepare safely. Use the loft hatch for a clear view and have a torch to hand. Keep your feet on a secure, boarded surface. If there’s no safe access, stop rather than stepping onto the ceiling.
- Find a clear spot. Look for insulation that isn’t covered by storage or tucked beneath boards. Don’t pull apart unfamiliar materials or reach around wiring.
- Measure gently. Stand a ruler vertically beside the insulation and read the depth without pushing down or flattening it. Check more than one accessible area.
- Record what you see. Note each measurement and where you took it. Add any visible gaps, compressed sections or areas you couldn’t reach.
How do you measure insulation without disturbing it?
Choose a spot where the insulation is easy to see, then hold the ruler upright from the loft-floor level to the top of the material. Don’t press the ruler into it. A single reading can be misleading: the layer may be thicker in one part of the loft and thinner near the hatch, eaves or stored belongings. Take a few safe readings and record them separately.
If the insulation is uneven, tangled with wiring or hidden beneath boards, don’t force access or move it to get a measurement. Mark that area as inaccessible. The measurement you can safely take is more useful than a precise figure gained by disturbing something you can’t identify.
What should you record before topping up?
Make a simple note of the insulation type if you recognise it, its measured depth, and any gaps or compressed areas. Also record visible signs of damp, damage or blocked ventilation. Don’t try to repair these issues or cover them with more material during your inspection.
Compare the measurements with current guidance before deciding whether a top-up is suitable. If the hatch is too small to inspect safely, the loft hatch enlargement guide explains what to expect from improving access. Unclear insulation or signs of damp deserve an assessment before more is added.
If your inspection points to a top-up, arrange loft insulation advice and an upgrade with JR Loft Boarding.
What should you do if your loft insulation is below the target depth?
A measurement below the 270mm reference target is a reason to look more closely, not proof that every part of your loft needs the same treatment. Compare what you found with current guidance, then consider the insulation’s type, condition and position. If you’re asking “how much loft insulation depth do I need?”, remember that a sensible next step depends on the whole loft, not one ruler reading.
When might an insulation top-up be worth considering?
If the existing insulation is in sound condition but appears thinner than the target, a top-up may be worth considering. The new layer needs to work with the material already there. A low or uneven measurement could also reflect gaps, compressed sections or insulation that’s been moved, so simply adding more across the whole loft may not address the underlying issue.
Damp, damaged or unfamiliar insulation needs attention before it’s covered. Ventilation routes and safe access must also be considered as part of the plan. JR Loft Boarding supplies and installs loft insulation top-ups and upgrades in Glasgow and nearby areas of central Scotland. The right work depends on what’s already installed and the layout of your loft.
Before planning work, bring your notes together:
- Compare the measured depth with the current recommended guidance.
- Note the material and any areas that look compressed, uneven or damaged.
- Identify ventilation openings and keep them clear.
- Think about safe access and whether you want to use the loft for storage.
This gives a clearer starting point than treating a single measurement as a full diagnosis. If you can’t safely inspect an area, don’t disturb wiring, stored items or roof materials to reach it. An unclear or damp section should be assessed before insulation is added.
How can you plan insulation alongside storage?
Storage boards laid directly on joists can compress insulation between them. That may reduce its thickness, even if the loft looked adequately insulated before it was boarded. If you want usable storage, plan the flooring and insulation together rather than fitting boards at a level that squashes the material.
Raised loft flooring creates space below the floor for insulation, helping storage and insulation work alongside each other. The amount of room needed depends on the existing build-up and the loft’s layout, so avoid assuming one arrangement will suit every home. Careful planning can make the space more practical without sacrificing the insulation beneath it.
For a considered top-up or storage plan, explore loft insulation and storage options with JR Loft Boarding.
Plan your loft around what you need next
Your next step can be a practical plan, not a rushed decision. Think about how you want to use the loft, what you’ve found during your inspection and whether anything needs attention before work begins. If you’re still asking “how much loft insulation depth do I need?”, focus on a suitable solution for your home rather than chasing a number without considering the space around it.
It can help to plan insulation and storage together. JR Loft Boarding provides insulation top-ups and upgrades, alongside raised loft flooring designed to avoid compressing the insulation below. That gives you a way to consider warmth and usable storage as parts of the same project, with the details shaped around your loft.
Take the time to choose a sensible next step, whether that means arranging an assessment or planning improvements for later. A clear plan can make the work feel more manageable and help you get more from your loft.
Talk to JR Loft Boarding about insulation and loft storage, and take the next step towards a loft that better suits your home.
Frequently Asked Questions
Is 270mm of loft insulation enough for a home in Scotland?
270mm is a useful reference target for many Scottish homes, but it isn’t a guarantee that every loft is adequately insulated. The right approach depends on the roof construction, existing material and any building work planned. If you live in Glasgow or nearby central Scotland, compare your loft with current guidance for the type of work involved. A measurement alone can’t confirm whether the insulation is in good condition or correctly installed.
Can you add new loft insulation on top of old insulation?
Yes, a top-up can be suitable if the existing insulation is dry, in reasonable condition and compatible with the new layer. First look for signs of damp, damage, pests or heavy compression, and note any ventilation openings that must remain clear. For example, if insulation is sound but shallow in one section, the plan may differ from a loft where the material is wet or badly disturbed.
Does the type of loft insulation change the depth you need?
Yes. Different materials can provide different thermal performance at the same thickness, so depth alone doesn’t tell the whole story. Mineral wool rolls, loose-fill and rigid boards also fit different parts of a loft in different ways. If you can identify the material, use its product information to understand its performance. If it’s unknown or several types have been combined, avoid assuming they are equivalent.
How do I measure loft insulation depth safely?
From a safe, boarded position, hold a ruler upright beside an accessible section and read the depth without pressing into the material. Take readings at a few clear points, since the layer may vary across the loft. Don’t step between joists, reach over stored belongings or move wiring to measure. If you can’t reach the insulation safely from the hatch or a walkway, leave that area unmeasured.
Can loft insulation block roof ventilation?
Yes, insulation can obstruct airflow if it’s pushed into eaves or laid across ventilation openings. Keep vents visible and clear, and don’t pack material into roof spaces without understanding how they’re designed to ventilate. If you can’t identify an opening or the airflow route, don’t cover it while adding insulation. A loft inspection can help distinguish a ventilation feature from an ordinary gap in the roof structure.
Does loft insulation need replacing if it is uneven?
Not necessarily. Uneven insulation may have shifted or been compressed, rather than needing complete replacement. Check whether the material is dry and intact, and note where coverage is thin or missing. A small gap and widespread damage are different issues. If the insulation is damp, crumbling or contaminated, don’t simply cover it with a new layer. Establish the cause and condition before deciding what work is appropriate.
Can you store items in a loft with deep insulation?
Yes, but storage needs a suitable floor that doesn’t squash the insulation. Boards resting directly on joists can compress material between them, so plan the floor height around the insulation depth. Raised loft flooring can provide usable storage space while leaving room beneath the boards. Keep stored items away from ventilation openings, wiring and equipment, and only use areas that can be accessed safely.


